Follow the steps on your console, then tick off each adjustment. Your progress is saved in this browser.
Choose a console for your needs
If you already own a PS5 or Xbox Series console, spend the first session improving its setup rather than ordering a replacement. Check the screen’s Game Mode, use the right HDMI input, calibrate the picture and make the controls comfortable. A configuration change can remove a weak link without replacing the entire system.
For a new premium desk setup, our starting point is a supported console, a 32-inch 4K OLED monitor with confirmed console 4K/120 and HDMI VRR, the standard controller and a suitable certified cable. At a sofa, a larger gaming TV can be the better fit. These are buying profiles, not a claim that one exact combination delivers an unannounced GTA VI frame rate.
PS5, PS5 Pro, Series X or Series S?
If you already have a PS5 or Xbox Series console, keep it for now. Wait for reliable GTA VI comparisons before deciding whether an upgrade is worth the money.
If you are buying your first console, PS5 and Xbox Series X are useful starting points. Choose the controller you like, check where your friends play and consider the games you already own.
With a larger budget and a good 4K screen, PS5 Pro is worth considering for the improvements supported by its games. Do not buy it on the assumption that GTA VI will offer a particular frame rate. Xbox Series S can lower the entry cost, but check storage space and remember that it uses digital purchases.
What PS5 Pro Enhanced does—and does not—tell you
The official PlayStation listing identifies GTA VI as PS5 Pro Enhanced. It also lists DualSense features. It does not provide a final table of resolution, frame-rate targets or performance modes. We will not turn that badge into a promise of 60 or 120 fps.
PS5 Pro supports PSSR in compatible games. A general console feature does not establish its implementation in every title. Likewise, a console Performance Mode preset can select an existing option in a supported game; it cannot manufacture a mode the developer did not provide.
A screen for your space
At a desk, compare 27-inch 1440p and 32-inch 4K screens before choosing by refresh rate alone. Readability, viewing distance, room reflections and whether the display also serves a PC matter. At a sofa, screen size and a usable TV Game Mode usually matter more than a monitor’s extreme PC refresh rate.
OLED is worth shortlisting for a premium picture, but inspect the exact model’s brightness features, reflections and panel-care guidance. LCD alternatives can make more sense for price, bright-room use or a work-heavy desk. Panel technology alone does not prove low input lag. A manufacturer’s pixel-response claim is not a measurement of the complete controller-to-screen delay.
For a new console-focused premium purchase, our checklist is 4K/120 input, HDMI VRR, a low-latency mode and usable HDR. A 240 Hz monitor can be useful for a separate PC; it is not a reason to expect 240 fps from a console.
- Check the maximum refresh rate through HDMI, not just DisplayPort.
- Confirm HDMI VRR for the console; a FreeSync or G-SYNC logo alone is not the full compatibility check.
- Treat HDR input support and impressive HDR picture quality as separate questions.
- Check the exact size and regional model: family names can hide different specifications.
Three actual screens to shortlist
For a smaller desk and a more contained budget, the 27-inch Alienware AW2725DM is a 1440p option. Its advertised 180 Hz maximum applies to DisplayPort; HDMI is listed at 144 Hz. It is not a 4K/120 display.
For a premium 4K desk setup, consider the 32-inch Alienware AW3225QF. Dell lists console support for 4K/120, VRR and automatic low-latency mode. Check whether you like a curved screen; its 240 Hz maximum does not mean a console game will run at 240 FPS.
If you prefer a larger screen, the 42-inch LG C6 OLED42C6PUA is another example. Check that it fits your viewing distance and room. Its listed native refresh rate is 120 Hz; the advertised 165 Hz requires a compatible PC.
These examples use official US model specifications, not our own product tests. Check the exact model, local price and independent reviews before buying. There are no affiliate links in this guide.
Connect and adjust the picture
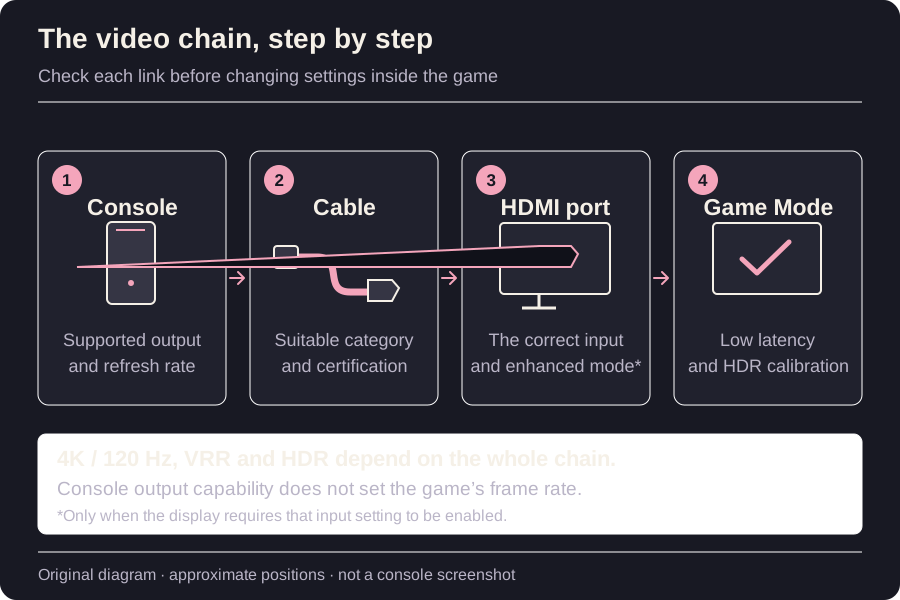
Read the console output, cable certification, exact display port and supported signal as one chain. HDMI 1.4, 2.0, 2.1 or 2.2 printed on a listing is not a complete specification. In particular, HDMI 2.1 features are optional; the name alone does not establish 4K/120, VRR or maximum bandwidth.
A certified Ultra High Speed cable is the useful starting category for a compatible 4K/120 chain. Ultra96 and HDMI 2.2 provide higher-bandwidth possibilities, but cannot give an older console new output modes. Do not replace a stable, suitable cable solely to obtain a higher number on the packaging.
Identify the exact HDMI input
Find your screen’s full model number and its HDMI signal table. Pick the port listed for your intended resolution, refresh rate, HDR and VRR combination. Different HDMI sockets on one screen can have different limits.
Connect the console directly
Use a suitable cable between the console and that port, leaving receivers, switches and capture devices out for the first test. For a compatible 4K/120 chain, check for certified Ultra High Speed HDMI rather than a vague gaming label.
Check the input’s signal setting
If the screen’s manual requires an enhanced or high-bandwidth HDMI setting, enable it for that particular input. The name and menu path depend on the exact screen; use its manual.
Read the console’s capability report
On PS5, open Video Output and the connected HDMI device information. On Xbox, open TV & display options → 4K TV details. Confirm the intended combination before adding other hardware.
Establish a stable direct connection first. Keep a suitable cable that already works reliably for your required signal.
The console reports the features you intend to use and the picture remains stable in compatible content. A higher cable version number alone is not the verification.
If you cannot find it or it does not work
If a feature is absent, recheck the exact input and its signal setting, then compare with a known suitable cable. Add a receiver, switch or capture device only after the direct connection works.
Game Mode, HDR and motion: keep a clean baseline
Enable the screen’s Game Mode or ALLM, and start with motion interpolation switched off in that mode. Set sharpness, black level and tone mapping according to the display’s manual rather than copying another model’s numbers. A film picture preset and a low-latency game preset serve different purposes.
VRR works within a supported operating range; it is not a universal cure for low frame rates or stutter. HDR calibration depends on the display’s capabilities and tone-mapping behaviour. Avoid increasing brightness until every dark area becomes gray, or crushing shadows just to obtain a more dramatic screenshot.
Select the console’s input and its Game Mode
Use the screen’s own controls to select its low-latency gaming picture mode. If using ALLM, check that the screen actually switches into that mode when supported gameplay begins. The exact route belongs to the screen’s manual.
Remove motion processing for the baseline
Start with motion interpolation off in that gaming mode. Keep black level, sharpness and tone mapping consistent with the display’s guidance rather than copying another model’s numbers.
Calibrate after choosing the picture mode
Run Adjust HDR on PS5 or Calibrate HDR for Games on Xbox with that picture mode active. Follow the patterns, then compare a familiar scene without changing the controller settings at the same time.
Use a stable low-latency mode as the starting point, then tune image preferences one at a time.
The screen shows its gaming mode on the console input and calibration patterns behave as instructed. Keep notes of the selected mode so later comparisons use the same baseline.
If you cannot find it or it does not work
If shadows turn grey or disappear, revisit the screen’s black-level and HDR instructions. If only VRR causes flicker, compare with VRR off and consult support for that exact display.
Follow your console’s settings
Menu wording can change with system software and language. A game’s own graphics options remain separate: the PS5 Performance Mode preset can select a supported option, but cannot unlock a mode the game does not offer.
- Settings
- Screen and Video
- Video Output
Read what the connection supports
Open Information for the Connected HDMI Device. Note the reported resolution, HDR and VRR support before changing anything. Current Video Output Signal describes the signal being sent now; it is not a benchmark of the game.
Set a supported resolution
Begin with Resolution on Automatic. For a 1440p screen, run Test 1440p Output, follow the checks on screen and select 1440p only if that is the output you want. A screen’s DisplayPort specification does not establish its HDMI modes.
Calibrate HDR in the right picture mode
Put the screen in its gaming picture mode first. Set HDR to On When Supported, then open Adjust HDR and follow the visible symbols on your own screen. Do not copy brightness-click counts from a different display.
Enable supported refresh features separately
Allow VRR and 120 Hz Output only when the console reports a suitable connection. Start with Apply to Unsupported Games off. Test each change on its own; these switches do not add a 120 fps mode to GTA VI.
Keep a reversible baseline
Leave RGB Range and Video Transfer Rate on Automatic unless you are investigating a specific signal fault. Record the settings you kept so you can return to them after an experiment.
Start with automatic signal detection, HDR only for supported content and a stable picture. Enable extra features after confirming the complete connection supports them.
Reopen the connected-device information. Confirm that the features you chose are supported, then check an actual compatible game. The home menu alone does not prove a game is rendering at 120 fps.
If you cannot find it or it does not work
If the picture flickers or drops out, undo the last change. Compare with VRR or 120 Hz Output disabled, one at a time, then check the cable, exact HDMI input and display firmware. Transfer Rate −1/−2 is a documented fault-isolation option, not a default quality upgrade.
Xbox Series: verify TV details before ticking every box
Work from the capabilities reported for your current connection. The steps below use the controls documented by Xbox; wording and grouping may vary with system updates and language.
- Settings
- General
- TV & display options
Open 4K TV details
Read which resolution, refresh-rate and HDR combinations the current connection reports. A missing checkmark is a reason to investigate the screen, port and cable; it is not proof that the console or game is broken.
Choose a supported output
Select the resolution and refresh rate supported by that connection. Keep automatic display detection as your starting point. Do not force an HDMI override just to expose another resolution.
Review Video modes
Under the Advanced heading, select Video modes and allow only the compatible features you intend to use. Compare VRR and high refresh separately. A 1440p/120 connection can have different Allow 4K or HDR behaviour from a 4K/120 connection.
Follow the calibration tools
With the screen already in its gaming picture mode, select Calibrate TV under Setup and follow its patterns. For compatible HDR output, select Calibrate HDR for Games under the same heading and complete its instructions on your own display.
Save the stable result
Revisit 4K TV details and note the chosen output. Check the result in compatible content. Menu wording can vary with system updates and language; the linked Xbox guide documents these controls.
Start with the detected display capabilities and a stable supported mode. A 120 Hz output setting is a hardware option, not a confirmation of a GTA VI frame-rate mode.
The requested output remains available, the screen keeps a stable picture and the required features appear in 4K TV details. Confirm HDR using compatible content after calibration.
If you cannot find it or it does not work
For corruption or flicker, compare with Allow variable refresh rate off; test 60 Hz separately. For unusual HDR colours, compare with Allow HDR10 off. If a feature stays unavailable, inspect the direct HDMI connection instead of forcing unsupported timings.
Finish the setup and check the result
Start with DualSense on PS5 or Xbox Wireless Controller on Xbox. Consider DualSense Edge or Xbox Elite Series 2 if remapping, rear controls or a particular grip would solve a real issue. Their price does not buy an automatic improvement in aim.
For your first session, save a default profile. If the game exposes separate camera and aiming sensitivity, adjust them separately. If it exposes a deadzone, start with the lowest stable setting that does not drift. These are tuning methods, not confirmation of GTA VI menu options or recommended numerical values.
Keep useful analog trigger travel for actions that require graduated input. On DualSense, compare comfortable vibration and adaptive-trigger resistance settings. On Xbox, vibration controls depend on the controller and game; the standard controller has no DualSense-style adaptive resistance. Compare the available options to find what feels comfortable. A USB cable alone is not proof of a lower-latency communication mode.
The rest of the setup: sound, storage and connection
Choose one audio path you can understand and calibrate: TV speakers, a headset or an AV system. Check the console’s supported output and any 3D-audio calibration. If sound feels delayed, compare a direct headset or TV connection with the external audio chain before stacking more processing.
Review storage using the actual requirement shown by the console. On PS5, USB storage is not a direct substitute for playing PS5 games from internal or compatible M.2 storage. Do not buy an SSD expecting a higher game frame rate. For downloads or online services, a stable network is useful; it does not raise the frame rate of local rendering.
A ten-minute routine for the first session
Record the baseline before changing anything. A phone photo of the settings and the model numbers is enough to make an experiment reversible. Repeat the same route or action when comparing settings, and change one variable at a time.
- Verify the console’s detected video signal and screen Game Mode.
- Calibrate the picture, then leave it alone while tuning controls.
- When the game is available, compare only graphics modes it actually offers.
- Practise a short camera turn, controlled aiming and gradual vehicle input where available.
- Save the comfortable result; revisit it after a patch only if something changes.
- Read the related HDMI and controller guides for troubleshooting rather than resetting everything.
Sources & editorial notes
Buying advice and setup methods based on manufacturer documentation checked November 3, 2026. We have not benchmarked these products or tested GTA VI. Product examples use US model numbers; local variants and prices can differ.
PlayStation — GTA VI features and PS5 Pro Enhanced listing ↗PlayStation — PS5 Pro capabilities ↗Xbox — Compare Series X and Series S ↗PlayStation Support — Resolution, HDR, VRR and video output ↗PlayStation Support — Game presets ↗Xbox Wire — TV setup, 4K details and calibration ↗HDMI Licensing Administrator — What HDMI 2.1 claims mean ↗HDMI Licensing Administrator — Certified cable categories ↗HDMI Forum — HDMI 2.2 specification ↗Dell — Alienware AW2725DM specifications ↗Dell — Alienware AW3225QF specifications and console support ↗LG — OLED42C6PUA C6 42-inch (2026) ↗LG Canada — OLED42C6PUA native refresh specification ↗VESA — DisplayHDR performance criteria ↗PlayStation Support — Storage and USB game storage ↗PlayStation Support — Compatible M.2 SSDs ↗Read our editorial standards