What these console enhancement tools are building
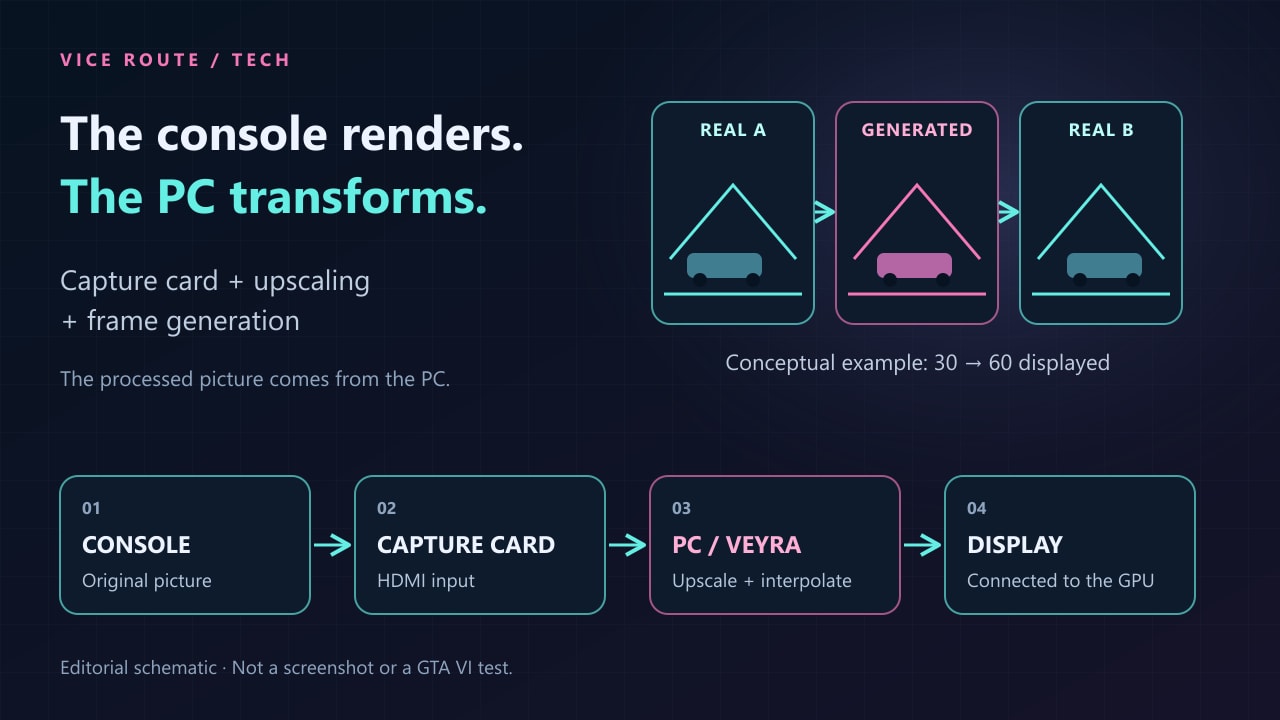
The idea is to use a PC as a video-processing station. The console runs the game and sends its picture over HDMI. A capture card brings that picture into the computer, where software applies upscaling, interpolation or other effects before displaying it. The controller stays connected to the console; the console does not gain more rendering power.
Veyra combines capture and processing in one application. Version 2.1.9 is the release consulted for this guide. Its integrated workflow makes it possible to select the input, effects and output without chaining several applications, though compatibility and delay still need checking.
PushFPS is a recent Veyra-derived project focused on console games and simpler profiles. Another approach uses a capture preview window with Lossless Scaling and its frame generation. These are alternative workflows, not a stack of required installations. Our tutorial uses direct capture in Veyra.
For GTA 6, this remains a setup to evaluate when the game is available. An interpolated trailer can illustrate a visual effect but cannot establish how a live game responds to the controller. We have no hands-on GTA VI results to justify a specific GPU, resolution or multiplier recommendation.
Upscaling, frame generation and image enhancement differ
Upscaling creates a higher-resolution output from the captured picture. It may improve its presentation on a higher-resolution display, but it adds no scene geometry and cannot reliably restore detail the console never rendered. A clean source is more useful than excessive sharpening of a poor capture.
Frame generation creates intermediate pictures to make movement look more continuous. In an ideal 30 FPS example, 2× targets 60 pictures per second, half generated; 4× would target 120 if the algorithm, GPU and display support it. Those are presentation targets, not measured GTA VI performance or native 60/120 FPS gameplay.
An HDMI signal at 60 Hz may still contain a 30 FPS game repeating each picture. The software needs to identify that cadence before interpolation. Otherwise, a high counter can coexist with duplicate frames and uneven motion.
Neural Rendering, or NR, is a separate AI image treatment. It can change textures, faces and lighting as well as their apparent detail. Veyra’s DLSS labels and community runtimes do not turn an HDMI-processing chain into an official in-engine GTA VI DLSS integration: the application receives a completed video image rather than the engine’s internal rendering data.

| Treatment | Goal | What it does not guarantee |
|---|---|---|
| Upscaling / SR | Higher-resolution presentation | More native game detail |
| Frame generation / FG | Smoother-looking movement | Native 60/120 FPS responsiveness |
| Neural Rendering / NR | Different image appearance | Faithfulness to the original image |
| HDMI capture | Video input for the PC | PC effects on the direct passthrough |
Swipe the table to see all columns.
Hardware and compatibility to check first
You need the console and game, a compatible capture card, a Windows PC with a suitable GPU, and a screen connected to that PC’s graphics card. Current Veyra documentation specifies Windows 11 x64 and DirectX 12. Application support does not mean every effect works on every GPU; use supported options and leave unavailable ones disabled.
Distinguish HDMI input, passthrough and the capture format delivered to software. A card advertising high-refresh 4K passthrough does not necessarily capture that same mode with HDR in your chosen pixel format. Check the manufacturer’s mode matrix, USB connection and cable.
The processed picture must be viewed from the PC output. The capture card’s HDMI OUT is the direct console route and is useful as a reference; it does not acquire the effects the PC applies later. Presenting every picture in a 120-per-second output also requires a display and configuration supporting at least 120 Hz.
We suggest 1080p60 SDR, with NV12 if available, as an initial diagnostic setup rather than the highest-quality setting. Higher capture resolution may preserve more information while increasing bandwidth and processing demands. Try existing hardware before budgeting for this experiment alone.
Judge the result with the controller in your hands
More continuous camera movement is the main attraction. It may be pleasant for exploring a city or driving, but aiming and quick corrections expose the trade-off: smoother-looking video does not guarantee quicker response, and capture plus processing add stages to the path.
Interpolation can misjudge vehicle edges, fences, particles, text and newly revealed objects. Inspect those areas during movement. Raising the multiplier can increase the output count without making the picture clearer.
An application’s GPU processing time does not necessarily include the console, capture card, queues and display. We therefore give no universal latency figure and do not treat submitted FPS as physically displayed frames. To estimate added delay, film the direct and processed outputs together with a high-speed camera and compare the same visible change.
Our starting approach is FG at 2× with SR and NR evaluated separately. If response feels uncomfortable or artifacts distract you, the direct route may be preferable. The project still lists experimental and unverified hardware paths; this is a practical experiment, not a promised best version of GTA 6.
Tutorial: prepare a Veyra capture-card test
Start with an available game whose graphics mode you know. Establish a clean capture before adding interpolation and image treatments. Control names may change with language or releases.
- Home
- Capture card
- Professional
- List
- Frame generation
Download the package for your processing GPU
In Veyra Releases, choose the current NVIDIA or AMD portable package. Extract to a new folder and run veyra_qml_ui.exe. Source archives are for rebuilding rather than running the packaged app. Install GPU and capture-card drivers separately according to their manufacturers.
Prepare the console signal
For this first test, use 1080p, 60 Hz and SDR, with HDR and VRR off during setup. On PS5, first connect directly to the display and disable Settings → System → HDMI → Enable HDCP for gameplay capture. On Xbox, close protected-video applications; restart if they leave HDCP active.
Connect the right video path
Console HDMI OUT goes to capture-card HDMI IN; the card connects to the PC through its required USB or PCIe interface. Connect the screen to the PC GPU and select that input to see Veyra. Capture-card HDMI OUT is an optional direct reference. Keep the controller paired to the console.
Establish picture and audio with effects off
Close OBS and other applications using the card. Under Home → Capture card, choose the device, resolution, rate, pixel format and audio input. Try 1080p60 SDR with NV12 where supported, or another supported mode. Check picture and sound before enabling SR, NR or FG.
Identify the actual source cadence
Open Professional → List and inspect cadence in Frame generation. For a 30 FPS game inside a 60 Hz capture, use capture deduplication or the 60→30 setting where appropriate. Do not apply that reduction to a true 60 FPS game. Repeated HDMI pictures should not inflate the generator’s source cadence.
Enable one supported generator at 2×
Choose an available FG backend compatible with your GPU and select 2×. Keep other treatments off to judge the change. Set Windows and the display to at least 60 Hz for a 60-picture-per-second target. Do not stack a second generator through NVIDIA App or Lossless Scaling during this test.
Add upscaling separately if needed
Under Picture, enable SR if you want to enlarge the capture to the output resolution. Choose a supported option and watch GPU load, memory and consistency. Reduce effect quality or resolution if playback becomes uneven. A 4K output label does not establish that the game renders internally at 4K.
Treat NR as optional
Save the previous configuration before enabling NR. Compare faces, text, shadows and movement without immediately stacking layers. Community runtimes and experimental AMD paths have their own limits. Turn NR off if it changes the appearance in ways you dislike; it is not required to use frame generation.
Check audio, response and moving detail
Select capture audio and the PC output you actually hear. Avoid monitoring both direct and processed audio, which may create echo. Compare effects off/on in the same camera movement, then against the direct route where available. Assess aiming, edges, HUD, sound and consistency before saving a profile.
Editorial starting point: 1080p60 SDR capture, verified source cadence and 2× FG. Add SR afterwards; reserve NR, HDR and higher multipliers for separate tests.
Watch the PC output. You should be able to disable FG and compare motion without losing the capture. Evaluate with the controller rather than relying on the FPS counter alone.
If you cannot find it or it does not work
Black picture: check HDMI IN, HDCP and a supported capture mode. Missing device: close competing apps and inspect drivers/ports. Washed-out colours: align SDR/HDR and limited/full range. Stutter: check duplicates, display refresh and GPU load; disable SR/NR. Smooth picture but uncomfortable controls: compare with the direct route and reduce or abandon processing.
Sources & editorial notes
Documentation reviewed November 15, 2026, using Veyra 2.1.9 and the linked capture guides. Some wiki pages describe earlier releases. GTA VI is unreleased at publication: we have not tested this setup with the game or measured its quality, performance or end-to-end latency. Suggested settings are an editorial starting point to test with another available game. Reference videos and posts are not independent measurements. Diagrams are original.
Veyra: application and current setup ↗Veyra 2.1.9: changes and limitations ↗Effects, cadence and latency guide ↗Console and capture connections ↗Capture-card compatibility ↗PushFPS: Veyra-derived project ↗Lossless Scaling: application features ↗Preparing PS5 for HDMI capture ↗HDCP on consoles and capture devices ↗Example capture and passthrough matrix ↗Reference video: external console processing ↗Reference discussion of interpolation and delay ↗Read our editorial standards